Get the Look - Galway Masterclass
January 17, 2020
3 minutes Read

Hello!
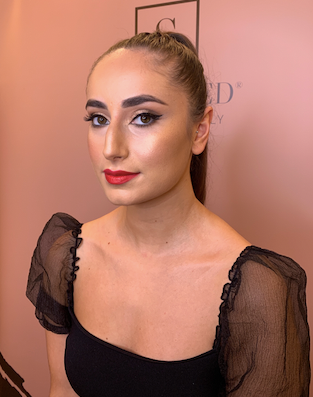
This week I'm going to chat through one of our lovely masterclass looks from last year! This one came from Galway and we just love this look!
Base
To prep the skin I used Beauty Base all over, I may be biased but I just love how this leaves the complexion. It's packed full of Hyaluronic Acid to hydrate the skin, completely protects with SPF30, and it leaves the skin with a gorgeous golden glow that it just ideal to wear on its own or underneath makeup!
Foundation
For this look I used the NARS Longwear Radiant with Armani Powder Fabric concealer underneath the eyes. This was pre launch of Second Skin so if you wanted to recreate the look using a completely mineral makeup I'd recommend using shade Tan from our Second Skin range! Pop 2-3 pumps of foundation onto your buffer brush and buff into the skin. I'd always recommend applying concealer underneath the eyes first and bringing your foundation up to meet this!


Eyes
For a nighttime look in particular I'd always begin by applying a primer to help the shadow stay in place longer and prevent creasing and fallout. MAC Painterly Paint Pot is one of my favourites and I would generally use my ring finger to apply. You can do so with a brush too, but I find it just as effective using my hand!
I then took my Blender brush and applied Medium Matte Bronze all over the lid bringing it around the crease of the eye, and underneath the bottom lash line, blending all the time. Using the Taperer brush I brought some MAC Brown Down into the outer corner of the eye and underneath for a full smokey look. I then used some Golden Glow Powder Highlight in the tear duct and centre of the lid to brighten the eye and make them pop!
To create the liner look I used the Benefit Roller Liner Pen along the lash line. This is a really easy liquid liner to work with as the tip is so tapered. I always begin at the centre of the eye and work outwards, this way you can build up on the liner rather than going too thick at the start. I always turn the liner around at the last lash line and bring it back towards the line you've drawn along the lashes and then fill in any gaps!
For a finish, I applied some individual lashes to the outer edges of the eye for some extra volume and definition!


Contour
For this look I used Medium Bronze from our own collection and swept it along the cheekbones, around the hairline and down the sides of the nose! The easiest way to achieve contoured cheekbones is using the Double Ended Brush - it's just the perfect size to hug the cheekbones and the sides of the nose without bringing product too low. The whole idea is to lift the face!
On from this I used Champagne Cream Highlight and popped this on using my ring finger. This is best applied using the warmth of your hand to help the product spread, and just tap tap tap it along the tips of the cheekbones, down the centre of the nose and on the cupids bow!
I then used the opposite end of my Double Ended Sculpted Brush to apply Golden Glow onto the exact same areas as the champagne cream, to give an extra sweep of highlight and glow, this is the perfect look for a night out and something I would often wear myself!
I then popped Pink Peony onto the apples of the cheeks using the Setter Brush and worked this slightly back towards the contour!
Lips
For this gorgeous statement lip I used our Double Trouble Lip Duo which is a really creamy lip liner and lipstick in one that offers a flattering blue-toned red lip. I love this as it makes teeth look whiter and give the perfect pout perfecting statement lip!
I hope you liked the edit!
Lots of love,
Aimee xx


